Deploy Advanced ACLs to Control Access Between the Internet and Intranet
Scenario Description
As shown in the following figure, Router A connects an intranet to the Internet. The intranet provides WWW, FTP, and Telnet services to the external users. The external address of the intranet is 202.18.1.88.
NAT is enabled on Router A so that PCs in the intranet can access the Internet and the PCs in the external network can access the internal servers. The ACL Management accesses Router A through 61.168.1.7
Deploy ACLs on the Router to meet the following requirements:
- Permit only the external user at 202.19.1.223 to access the internal servers.
- Permit the internal hosts in the address range from 61.168.1.1 to 61.168.1.5 to access the Internet.
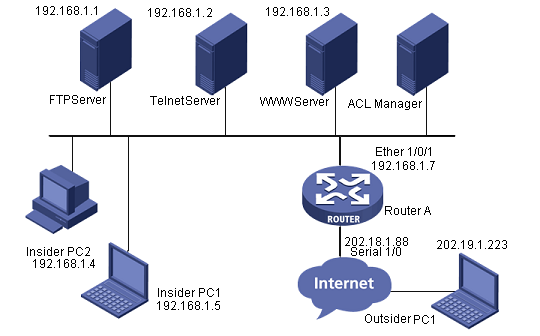
Network diagram
Scenario Analysis
To permit only the external user at 202.19.1.223 to access the internal servers, deploy an ACL to Serial 1/0 to allow incoming packets soured from 202.19.1.223 to 202.18.1.88 to pass through.
To permit the internal hosts in the address range from 61.168.1.1 to 61.168.1.5 to access the Internet, deploy an ACL to Ethernet 1/0/1 to allow outgoing packets sourced from 61.168.1.1 to 61.168.1.5 to pass through.
Operation Procedure
- Add device to the the system platform.
In the the system homepage, click Add Device in the My Shortcut tree. Enter 61.168.1.7 (IP address of Router A) in the Host Name/IP text box.
- Add ACL resource for internal access control.
a. Select the Service tab, select ACL Management and click ACL Resource in the navigation tree, click Add and then click Common ACL Resource to enter the ACL Resource page.
b. Select Advanced for ACL Type, type the ACL identifier 3001 and enter the ACL resource name Control Internet Intranet, then click OK.
- Add ACL rule set for internal access control.
a. In the ACL Resource page, click the 3001 identifier link.
b. Click Add. Enter the basic information and click Next.
c. Click Add to enter the Add Rule page. Set the protocol to ip, set the action to permit, set the time range to Undefined, select IP Address/Mask in the Source Address area and type 61.168.1.1/32, select All in the Destination Address area, accept the defaults for the other items, and finally click OK.
d. Repeat Step 3 to add four ACL rules with their source IP addresses ranging from 61.168.1.2/32 to 61.168.1.5/32.
e. Click Add to enter the Add Rule page. Set the protocol to ip, set the action to deny, set the time range to Undefined, select All in the Source Address area, select All in the Destination Address area, accept the defaults for the other items, and finally click OK.
f. Click Finish.
- Access ACL Devices.
a. Select the Service tab, select ACL Management and click ACL Devices in the navigation tree to show the ACL device list. Click the ACL Config link  of Router A to enter the ACL configuration page of Router A.
- Add ACL definition.
a. Select the ACL Definitions tab and click Add. Select 3001 and the rule set you have just added, and then click Next.
b. Click Deploy. Set the task name to setRule, set the deployment order to Serial, set the error handling mechanism to Stop all deployments when error occurs, set the execution time to Immediately, and then click OK.
- Add ACL use.
a. Select the ACL Uses tab and click Add. Set the service type to Packet Filter, and then click Next.
b. Set the filter direction to inbound, select Ethernet1/0/1, and then click Next.
c. Select 3001 and click Next.
d. Set the task name to addApp7, set the deployment order to Serial, set the error handling mechanism to Stop all deployments when error occurs, set the execution time to Immediately, and then click OK.
- Add ACL resource for external access control.
a. Select the Service tab, select ACL Management and click ACL Resource in the navigation tree, click Add and then click Common ACL Resource to enter the ACL Resource page.
b. Select Advanced for ACL Type, type the ACL identifier 3002, enter the ACL resource name, and click OK.
- Add ACL rule set for external access control.
a. In the ACL Resource page, click the 3002 identifier link.
b. Click Add. Enter the basic information and click Next.
c. Click Add to enter the Add Rule page. Set the protocol to tcp, set the action to permit, set the time range to Undefined, select IP Address/Mask in the Source Address area and type 202.19.1.223/32, select IP Address/Mask in the Destination Address area and type 61.168.1.1/32, set the destination port to 21 and 20, accept the defaults for the other items, and finally click OK.
d. Click Add to enter the Add Rule page. Set the protocol to tcp, set the action to permit, set the time range to Undefined, select IP Address/Mask in the Source Address area and type 202.19.1.223/32, select IP Address/Mask in the Destination Address area and type 61.168.1.2/32, set the destination port to 23, accept the defaults for the other items, and finally click OK.
e. Click Add to enter the Add Rule page. Set the protocol to tcp, set the action to permit, set the time range to Undefined, select IP Address/Mask in the Source Address area and type 202.19.1.223/32, select IP Address/Mask in the Destination Address area and type 61.168.1.3/32, set the destination port to 80, accept the defaults for the other items, and finally click OK.
f. Click Add to enter the Add Rule page. Set the action to deny, set the time range to Undefined, select All in the Source Address area, select All in the Destination Address area, accept the defaults for the other items, and finally click OK.
g. Click Finish.
- Access ACL Devices.
a. Select the Service tab, select ACL Management and click ACL Devices in the navigation tree to show the ACL device list. Click the ACL Config link of Router A to enter the ACL configuration page of Router A.
- Add ACL definition.
a. Select the ACL Definitions tab and click Add. Select 3002 and the rule set you have just added, and then click Next.
b. Click Deploy. Set the task name to setRule2, set the deployment order to Serial, set the error handling mechanism to Stop all deployments when error occurs, set the execution time to Immediately, and then click OK.
- Add ACL use.
a. Select the ACL Uses tab and click Add. Set the service type to Packet Filter, and then click Next.
b. Set the filter direction to inbound, select Serial1/0, and then click Next.
c. Select 3002 and one of its rule sets, and then click Next.
d. Set the task name to addApp2, set the deployment order to Serial, set the error handling mechanism to Stop all deployments when error occurs, set the execution time to Immediately, and then click OK.
Precautions
- To modify and deploy an ACL, you must stop the use of the ACL first.
- In the ACL Uses page, if Packet Filter is selected and the port to which the ACL is applied belongs to a link aggregation, the ACL is applied to all the ports of the link aggregation.
- IP address masks are used in ACL Management, and the inverse masks are used on devices.
- After the deployment, you can view the result in the task list. Only Succeeded indicates the deployment is successful.
 Deploy Advanced ACLs to Control Access Between the Internet and Intranet