Auto Deployment Plan
Scenario Description
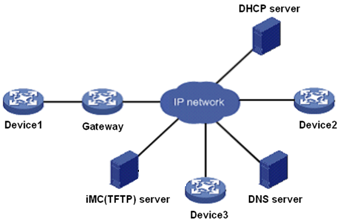
A company purchases a set of network devices and replans the network. The current network includes the following types of devices: newly-purchased devices with factory settings (zero configuration devices), simple-configuration devices that have not been added to the system, and devices that have been added to the system. Using the Auto Deployment Plan function of iCC, you can deploy configurations and upgrade software for these devices, labeled as Device 1, Device 2, and Device 3 in the network diagram.
Continuing with the names of Device 1, Device 2, and Device 3 for this example, the following table describes how to configure the Auto Deployment Plan function.
| Device type |
Zero configuration |
Initial configuration file |
Added to the system |
MAC address |
Current IP address |
Target IP address |
Software to deploy |
Configuration file to deploy |
| Device1 |
Yes |
autocfg_startup_device1.cfg |
No |
12-a3-22-13-3e-22 |
N/A |
10.153.128.79 |
software1.bin |
cfgFile1.cfg |
| Device2 |
No |
N/A |
No |
N/A |
10.153.128.12 |
10.153.128.14 |
software2.bin |
cfgFile2.cfg |
| Device3 |
No |
N/A |
Yes |
N/A |
10.153.128.55 |
10.153.128.55 |
software3.bin |
cfgFile3.cfg |
Scenario Analysis
Continuing with the example, the devices are on the same network segment and an auto deployment plan named NetPlan is created to manage the devices.
When Device1 (with zero configurations) is powered on, the following auto deployment procedures apply:
- DHCP automatically assigns an IP address to Device1.
- the system detects Device1, and deploys the specified configuration file and software on Device1 according to the auto deployment plan.
Before performing auto deployment for a zero-configuration device, you must configure on the DHCP server the address pool, TFTP server, initial configuration file name, and gateway. According to the network plan, configure the DHCP server as follows in this example:
#
dhcp server ip-pool s0
network 10.153.89.0 mask 255.255.255.0
gateway-list 10.153.89.2
expired day 7
bootfile-name autocfg_startup.cfg
tftp-server ip-address 10.153.88.26
#
The following auto deployment procedures apply for Device2:
- Adds Device2 to the system.
- The system deploys the specified configuration file and software on Device2 according to the auto deployment plan.
The following auto deployment procedures apply for Device3:
- Expand the corresponding auto deployment plan on the auto deployment plan management page.
- Click the
 icon for Device3. The system deploys the specified configuration file and software on Device3 according to the auto deployment plan.
Configuration Procedures
- Select the Service tab, click the Configuration Center in the navigation tree to enter the Auto Deployment Plan page.
- Add an auto deployment plan named NetPlan:
- Click Add.
- Enter the auto deployment plan name NetPlan.
- Click OK.
- Create an initial configuration file autocfg_startup_device1.cfg for Device1 with zero configurations.
- On the auto deployment plan management page, click the Initial Configuration File Management link on the upper right of the page.
- Click Add.
- Set snmpv1_community_read to public, snmpv1_community_write to private, telnet_user_name to admin, and telnet_password to admin in the access parameters area, set the file name to autocfg_startup_device1.cfg, and select initial configuration file template auto_intelbras.xml (which is pre-defined) to generate the file contents.
- Click OK.
- Add auto deployment device Device1.
- On the auto deployment plan management page, click the
 icon for auto deployment plan NetPlan.
- Select cfgFile1.cfg as the configuration file to deploy, and software1.bin as the software to deploy, set the match criteria MAC address to 12-a3-22-13-3e-22 and target IP address to 10.153.128.79, and configure the device label as Device1.
- Click OK.
- Add auto deployment device Device2.
- On the auto deployment plan management page, click the icon for auto deployment plan NetPlan.
- Select cfgFile2.cfg as the configuration file to deploy, and software2.bin as the software to deploy, set the match criteria current IP address to 10.153.128.12 and target IP address to 10.153.128.14, and configure the device label as Device2.
- Click OK.
- Add auto deployment device Device3.
- On the auto deployment plan management page, click the icon for auto deployment plan NetPlan.
- Select cfgFile3.cfg as the configuration file to deploy, and software3.bin as the software to deploy, set the match criteria current IP address to 10.153.128.55 and target IP address to 10.153.128.55, and configure the device label as Device3.
- Click OK.
- Perform auto deployments for the three devices.
- Power on Device1, connect it to the network, and then the auto deployment starts for Device1.
- Add Device2 to the system, and then the auto deployment starts for Device2.
- On the auto deployment plan management page, expand auto deployment plan NetPlan, and click the icon for Device3 to trigger deployment.
- View the auto deployment plan execution results.
On the auto deployment plan management page, expand auto deployment plan NetPlan, and you can see the operating status of the three devices.