Configure WLAN
Scenario
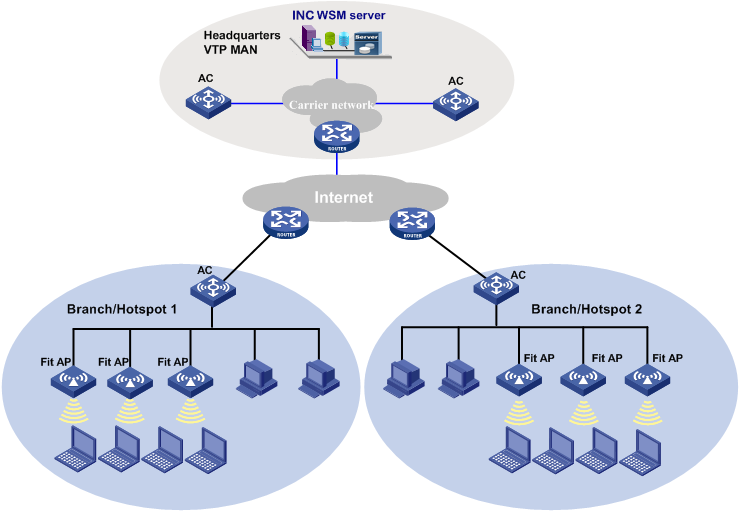
A company wants to build a cost-effective internal wireless LAN in each of its branches. The branches are connected to the headquarters over the Internet, as shown in the following figure:

WSM network diagram
Guidelines
To meet network requirements, you can use the AC plus fit AP networking scheme, in which ACs can be either deployed on the enterprise backbone, the ISP's MANs, or the entries of branches. Fit APs are deployed at the branches and work with the ACs to provide wireless access. WSM is deployed on the enterprise backbone or the ISP's MANs for centralized management of the wired and wireless networks.
Procedure
- Add wireless devices by using the Auto Discovery or Add Device function of the INC platform.
- Configure AC parameters:
- Click the Resource tab, and then select Service > WLAN Manager > Resource Management > ACs from the navigation tree.
- Click an AC to open the Device Details page.
- In the Basic Parameter Information area, click Modify to open the AC Parameter Configuration page.
- Set the area code and traffic/client load balancing thresholds, and then click OK.
- Add fit AP templates for the AC:
- Open the Device Details page of the AC.
- In the AP Information area, click View All to open the Fit AP Information List page.
- Click Add or Import to add fit AP templates.
- Set the template name, AP name, model, and other parameters as needed, and then click OK.
- Add service policies for the AC:
- Open the Device Details page of the AC.
- Click Service Policy Management to open the Service Policy Management page.
- Click Add Policy to open the Add Service Policy page.
- Set the policy ID, SSID, interface ID, encryption mode, authentication mode, and other parameters as needed, and then click OK.
- Add radio policies for AC:
- Open the Device Details page of the AC.
- Click Radio Policy Management to open the Radio Policy Management page.
- Click Add Policy to open the Add Radio Policy page.
- Set the policy name and other parameters as needed, and then click OK.
- Configure radio parameters for each fit AP:
- Open the Device Details page of the AC.
- Click View All to open the Fit AP Information List page.
- Click a fit AP to view its details.
- The details page shows all the radios of the fit AP. Click the Modify icon for a radio to open the Modify Radio Parameters page.
- Set the admin status to Up, select a radio policy from the Radio Policy list, select one or more service policies from the Service Policy list, and then click OK.
- Verify the configuration:
- In the Network Connections window of a wireless terminal, double-click the Wireless Network Connection icon to open the Wireless Network Connection page.
- Click Refresh network list on the left to search the area for wireless networks.
- When the search finishes, the SSIDs that you configured are displayed in the network list. This verifies that a WLAN was successfully created.

