Configure WLAN Mesh Network
Scenario
A company wants to build a cost-effective internal wireless LAN in each of its branches. The branches are connected to the headquarters over the Internet, as shown in the following figure:
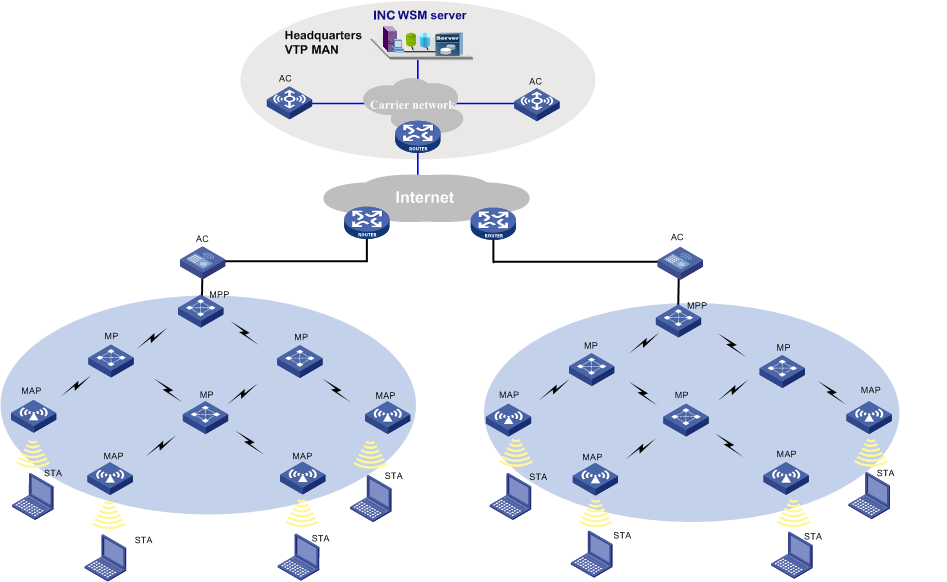
Network diagram
Guidelines
To meet network requirements, use ACs and fit APs. ACs can be either deployed on the enterprise backbone, the ISP's MANs, or the entries of branches. Fit APs are deployed at the branches and work with the ACs to provide wireless access. WSM is deployed on the enterprise backbone or the ISP's MAN for centralized management of the wired and wireless networks.
Procedure
- Add an AC by using the Auto Discovery or Add Device function of the INC platform.
- Configure AC parameters:
- Locate the target AC by clicking Resources or selecting Service > WLAN Manager > Resource Management > ACs.
- Click the AC name to open the Device Details page.
- Click Modify, set the area code to CN, set the traffic or client load balancing threshold, and then click OK.
- Add fit AP templates for the AC:
- On the Device Details page of the AC, click View All to open the Fit AP Information List page.
- Click Add or Import to add fit AP templates.
- Set the AP name, template name, and model, and then click OK.
- If an AP is an MPP, you also need to enable the mesh portal.
- Add MP policies for the AC:
- On the Device Details page of the AC, click MP Policy Management to open the MP Policy Management page.
- Click Add Policy to open the Add MP Policy page.
- Set the policy name, enable link initiation, link maximum number and link rate mode as needed, and then click OK.
- Add mesh interfaces for the AC:
- On the Device Details page of the AC, click Mesh Interface Configuration to open the Mesh Interface Configuration page.
- Click Add Interface to configure the mesh interfaces and click Modifying Port Security to configure port security for the mesh interfaces.
- Configure peer MAC addresses:
- On the Device Details page of the AC, click View All to open the Fit AP Information List page, and then select a fit AP to open the details page of the fit AP.
- Click the Copy icon
 for the target radio to open the Configure Peer MAC Address page.
- Add a peer MAC address as needed.
- Add a mesh profile for the AC:
- On the Device Details page of the AC, click Mesh Profile Management on the page to open the Mesh Profile List page.
- Click Add Mesh Profile to open the Add Mesh Profile page.
- Set the mesh profile ID, mesh ID, mesh interface ID, and link keep-alive interval, and then click OK.
- Bind mesh profile:
- On the Device Details page of the AC, click View All on the page to open the Fit AP Information List page.
- Select a fit AP to open the details page of the fit AP.
- Click the Modify icon for a radio to open the Modify Radio Parameters page.
- Select the mesh profile to be bound to the radio, and then click OK. Radios that need to establish mesh links must be bound to a mesh profile.
- Verify the configuration:
- On the view topology, click Wireless Device to open the Wireless Device page.
- Right-click the AC for which mesh links are to be configured, and then select Open Mesh Topology from the shortcut menu. You can see that the mesh network is successfully set up.