INC Cloud App
User Guide
INC Cloud App
User Guide
The Intelbras INC Cloud App is a mobile tool designed to simplify the daily routine of IT technicians and administrators. The application allows you to manage corporate networks, monitor devices, analyze traffic in real time, and perform signal and connectivity diagnostics directly from your smartphone, combining practicality and control on the go.
EXPORT TO PDF
To export this manual to PDF format, use your browser's printing features (Chrome® or Firefox®). Press CTRL + P or click here.
Adding an AP and creating a new site
The Intelbras INC Cloud mobile app allows you to configure and activate new Access Points on your corporate network in a few minutes using your smartphone. Before starting, ensure that your devices are connected to the physical network with DHCP active and powered on. The adoption and linking process can be performed through two main flows described below, according to your infrastructure:
Case A: Create a New Site when registering the first device
- Open the app and log in with your Intelbras INC Cloud account.
- On the home screen (sites list), click on the "+" button located in the bottom right corner of the screen.
- Point your smartphone's camera at the QR Code printed on the Access Point label. If you encounter focus or reading difficulties, select Enter Serial Manually and type the product serial number (S/N).
- Since the device does not have an associated location yet, the Create network site screen will be displayed automatically.
- Enter the Site name (from 1 to 20 characters), select the corresponding Region code, and click the OK button.
- The site will be created and the Access Point will be linked to it. As soon as the AP is connected to the network with DHCP enabled and powered on, it will sync automatically and show an Online status.
Case B: Add a device to an Existing Site
- On the app's home screen, tap the existing site where you want to add the device (e.g., TESTE).
- On the site's main dashboard, swipe up the bottom Site Area (Área do Site) bar to open the settings.
- Under the Basic configuration (Configuração básica) tab, tap the Add device (Adicionar dispositivo) icon.
- Point your phone's camera at the new Access Point's QR Code (or enter the Serial/SN manually).
- Confirm the link. The new equipment will start receiving the configurations defined for the active site.
SITE CONFIGURATION
The Site Configuration section is the central dashboard of the application, where you manage all the properties of the selected location. Through it, you can monitor the operational status of the network in real time, manage adopted devices, view client data flows, and access advanced control utilities. The features of this section are structured into the following modules:
VIEW TOPOLOGY
The Topology tab offers an interactive, dynamic graphical representation of the physical and logical connections of your local infrastructure. The app intelligently identifies the cabling order (e.g., Router → Switch → Access Point) and displays the traffic status of each link, making it easy to identify disconnected ports or faulty cables instantly.
NETWORK
The Network section allows you to view the WAN and LAN IP addressing of the site, configured DNS servers, active DHCP ranges, and cloud connection status (public IP and latency to the INC Cloud server).
DEVICE DETAILS
On the site screen (featuring the Devices and Network tabs), click directly on the icon of the desired equipment (e.g., AP5626) to access the Device Details. This screen displays connection status (e.g., Online), serial number (SN), device version, model, MAC address, and management IP. Internal settings are divided into three main tabs:
DEVICE CONFIGURATION
Centralizes operational settings exclusive to the selected hardware.
Radio Configuration
Allows optimizing and adjusting signal transmission for the Access Point's frequencies (e.g., 2.4G and 5G-1). Tapping on the radio card allows configuring the following options:
- Enable Toggle: Turns the transmission of that specific frequency on or off.
- Mode: Selects the supported network standard (e.g., 802.11a, 802.11n, 802.11ac, 802.11ax).
- Bandwidth: Defines the transmission channel width (e.g., 20, 40, 80 MHz, or Auto).
- Channel: Defines the frequency channel for radio operation or select AUTO.
- Power: Adjusts the radio transmission power using a signal intensity slider (Low, Medium, High, Maximum).
Step-by-step:
- On the main dashboard of the active site, access the Devices tab.
- Tap on the Access Point you want to configure (e.g., AP5626).
- On the product details screen, access the Device configuration tab.
- Tap on the radio frequency you want to adjust (e.g., Radio 1 (2.4G) or Radio 2 (5G-1)).
- Adjust the desired parameters and tap Save (or OK) to apply the new physical signal properties.
PERFORMANCE
Presents real-time hardware usage statistics containing the frequency monitor (upload/download traffic), CPU usage rate, and memory usage rate.
How to view:
- In the Devices tab of the active site, tap on the desired Access Point.
- Access the Performance tab at the top of the details screen.
- Select the time period filter in the upper corner of the screen (options: Today or Last 7 days).
- Swipe the screen to follow the real-time usage graphs for processing (CPU), RAM memory, and upload/download traffic.
OPERATIONS
Individual administrative actions that can be executed on the selected hardware:
Device Reboot
Allows rebooting the selected equipment. Tapping this option prompts three actions: Save and reboot, Reboot, or Reset connection (reconnects to the cloud without power cycling).
Step-by-step:
- In the Devices tab of the active site, tap on the desired Access Point.
- Access the Operations tab at the top of the details screen.
- Tap the Device Reboot menu.
- Select the desired action: Save and reboot, Reboot, or Reset connection, and confirm the operation.
Version Upgrade
Displays the device's firmware status, indicating whether it is up to date. It also shows the installed version number and the available storage space on the system partition.
Step-by-step:
- In the Devices tab of the active site, tap on the Access Point.
- Access the Operations tab on the details screen.
- Tap the Version Upgrade menu.
- Check the current firmware information. If a version upgrade is available, tap the corresponding button to start download and flash writing.
Configuration Backup
Allows generating a security backup containing the device's current settings. You must enter a backup description or reason (1 to 20 characters) to enable and save the backup file.
Step-by-step:
- In the Devices tab of the active site, tap on the Access Point.
- Access the Operations tab and select Configuration Backup.
- In the text field, enter a brief description for the backup (1 to 20 characters).
- Tap the confirmation button to save the backup file to the account.
Configuration Restore
Displays the list of backup files created for this device, sorted by name and creation date/time.
Step-by-step:
- In the Devices tab of the active site, tap on the Access Point.
- Access the Operations tab and select Configuration Restore.
- On the displayed list, locate the desired backup using the description and creation date.
- Tap on the backup and select Configuration Restore to apply the parameters.
Delete Device
Removes the selected equipment from the active INC Cloud site, clearing all its local data, restoring it to factory defaults, and freeing the serial number for new registrations.
Step-by-step:
- In the Devices tab of the active site, tap on the Access Point.
- Access the Operations tab and select Delete Device.
- Read the security warnings about the unlinking process and tap the delete button to confirm.
Site Area
This section presents the basic and advanced configuration menus for the selected site.
BASIC CONFIGURATION
Menu intended for quick infrastructure adjustments for the selected site.
Wi-Fi Configuration
Allows creating and managing multiple wireless networks (SSIDs) in a centralized manner for the active site in the app:
- Access the Site Area, select the Basic Configuration tab, and tap Wi-Fi Configuration.
- For management, you can create multiple SSIDs or edit an existing network by tapping on the corresponding entry.
- On the configuration screen, the following parameters can be set:
- Wi-Fi Name: Set the wireless network name (SSID).
- Wi-Fi Encryption: Enable this switch if you want to protect the network with a security password. Once enabled, the Wi-Fi Password field will be displayed for typing the access key. If disabled, the Wi-Fi network will remain open.
- Enable Wi-Fi: Switch to enable or disable the transmission of the Wi-Fi network by the APs.
- In the Advanced configuration menu (click to expand), you can adjust:
- Wi-Fi Signal Band: Associate and select the radio frequencies on which the network will operate (e.g., Radio 1 (2.4G), Radio 2 (5G-1), Radio 3 (5G-2)).
- Hide Wi-Fi: Enable if you want to hide the SSID, requiring users to manually type the network name to connect.
- VLAN ID: Sets the VLAN identification associated with the SSID (default is 1).
- At the end, click Save to propagate the changes automatically to all Access Points on the site.
Important (VLAN Tip): The default VLAN ID is 1. If you configure a VLAN ID other than 1, make sure that the local network has an active DHCP address pool configured for this VLAN; otherwise, devices connecting to this Wi-Fi will not be able to obtain an IP and will have no internet access.
Management Password
Change the unified local access password for all devices belonging to this site. This password is used to access the local web interface or CLI of the equipment.
Step-by-step:
- On the active site panel, swipe up the Site Area drawer at the bottom.
- Under the Basic configuration tab, tap the Management password icon.
- Enter the new unified password (must contain between 8 to 16 characters, combining letters and numbers) and confirm it by typing it again.
- Tap the Save button to propagate the new password to all devices in the site.
Reboot
Allows rebooting all devices associated with this site simultaneously or individually selecting the specific equipment you want to reboot.
Tip: Device reboot takes 3 to 5 minutes. During this period, the network and services of the selected equipment will be disconnected, so proceed with caution.
Step-by-step:
- On the active site panel, swipe up the Site Area drawer.
- Under the Basic configuration tab, tap the Reboot icon.
- The app will display the list of adopted devices in the site. To reboot all devices simultaneously, check the Select all box. To reboot specific units, individually check only the desired devices.
- Tap the Reboot button at the bottom and confirm the operation in the pop-up window.
Upgrade
Allows viewing all devices linked to the site, listing the model, serial number (SN), and current firmware version installed on each device. The app checks if there are new upgrades available.
Step-by-step:
- On the active site panel, swipe up the Site Area drawer.
- Under the Basic configuration tab, tap the Upgrade icon.
- The list of linked devices will load, displaying the firmware version installed on each one.
- If new upgrades are available for one or more devices, select the devices you want to upgrade and tap Upgrade version. If all devices are already running the latest version, the confirmation "All devices are already on the latest version" will be shown.
Delete Site
This operation permanently removes the active site and all data associated with it. During this process, all devices belonging to the site will be restored to their factory default settings and automatically rebooted.
Tip: Restoring to factory defaults permanently clears all configurations on the devices, with no possibility of reversion. If you are not physically present at the network's location, proceed with extreme caution to prevent services and remote management from becoming permanently unavailable until local intervention takes place.
Step-by-step:
- On the active site panel, swipe up the Site Area drawer.
- Under the Basic configuration tab, tap the Delete site icon.
- Read carefully the warnings about the permanent deletion of data and the restoration of APs to factory default settings.
- Confirm by entering the confirmation word or tapping Confirm in the security pop-up.
ADVANCED CONFIGURATION
Fine-tuning security and local network issue mitigation settings for the site.
Anti-loop
Incorrect physical cable connections on the local network can generate loops, which in turn can trigger broadcast storms and even completely paralyze network data traffic. The loop mitigation feature (Anti-loop) works by detecting and mitigating these potential loops to ensure the stability and reliability of the entire local infrastructure.
Step-by-step:
- On the active site panel, swipe up the Site Area drawer.
- Select the Advanced configuration tab and tap the Anti-loop icon.
- Turn on the Anti-loop switch to enable loop protection on the physical local network.
- Tap the Save button to apply the setting to the devices.
Intrusion Detection (Anti-violação)
Uses DHCP snooping technology to ensure that DHCP clients obtain IP addresses only through a valid DHCP server. Trusted ports will forward DHCP packets correctly, while untrusted ports will discard DHCP ACK and DHCP OFFER packets after receiving them.
Step-by-step:
- On the active site panel, swipe up the Site Area drawer.
- Select the Advanced configuration tab and tap the Intrusion Detection (Anti-violação) icon.
- Turn on the Intrusion Detection (Anti-violação) switch to start DHCP Snooping filtering of unauthorized DHCP servers.
- Tap the Save button to propagate the setting to the devices.
TOOLS
The Tools menu of the Intelbras INC Cloud application provides a comprehensive set of diagnostic utilities to assist in the physical and logical validation of your wireless network directly at the installation site. Upon accessing the tab, the app immediately presents a consolidated view of your smartphone's Wi-Fi link, showing crucial details such as connected SSID, frequency and bandwidth (e.g., 5G 160MHz), signal strength (dBm), transmission rate (Mbps), active channel, IP addressing (local and gateway), and DNS servers, accompanied by a real-time signal variation graph. From this panel, you can run the following advanced diagnostic tools:
Notice: The Channel Interference and Wi-Fi Detection tools are only available in the application version for Android devices.
Channel Interference
Performs a real-time ambient radio frequency scan for the 2.4 GHz and 5 GHz bands. Graphically displays in waves/curves the signal strength (dBm) of all detected neighboring Wi-Fi networks (SSIDs), and details the interference count per individual channel of the spectrum (e.g., Channel 1, Channel 6, Channel 11), allowing you to visually identify saturated bands and select the cleanest channel.
Wi-Fi Detection
Runs a detailed diagnostic on the network the smartphone is connected to, scoring overall network quality. The diagnostic covers:
- Signal Strength: Real-time measurement of the received signal level (e.g., -50dBm - Excellent).
- Channel Interference: Saturaion evaluation of channels in the environment (e.g., Minor interference).
- Network Speed: Measurement of current download and upload link rates (e.g., 78.3Mbps).
- Network Security: Analysis of the active encryption method (e.g., signaling Open service or lack of security).
Tapping View details displays the Diagnostic Details screen with in-depth information, including latency and packet loss tests for the Web Experience (Google page load), DNS server connectivity, and Gateway connectivity, complete IP/BSSID/ISP details, and a thorough analysis of radio frequency interference for the active channel.
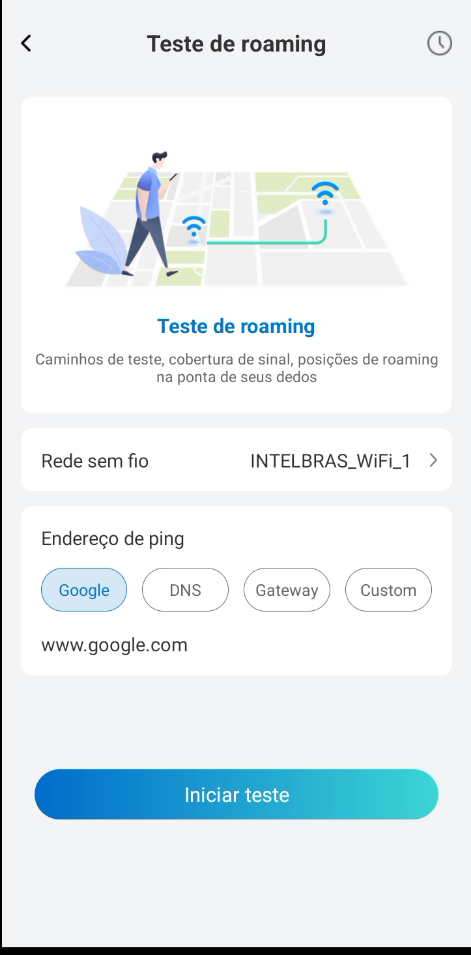
Roaming Test
A tool designed to test, validate, and map the connectivity transition (roaming) of a mobile client as it moves through the coverage area of different Access Points at the site. The process is performed as follows:
1. Test Configuration and Start:
- Wireless network: Select which active wireless network (SSID) on site you wish to test.
- Ping address: Define the destination of ICMP packets (Ping) to measure latency and packet loss during movement. You can choose from predefined destinations (Google accessing www.google.com, the local DNS server, or the network Gateway) or define a custom address under Custom.
After configuring the parameters, click the Start test (Iniciar teste) button at the bottom of the screen.
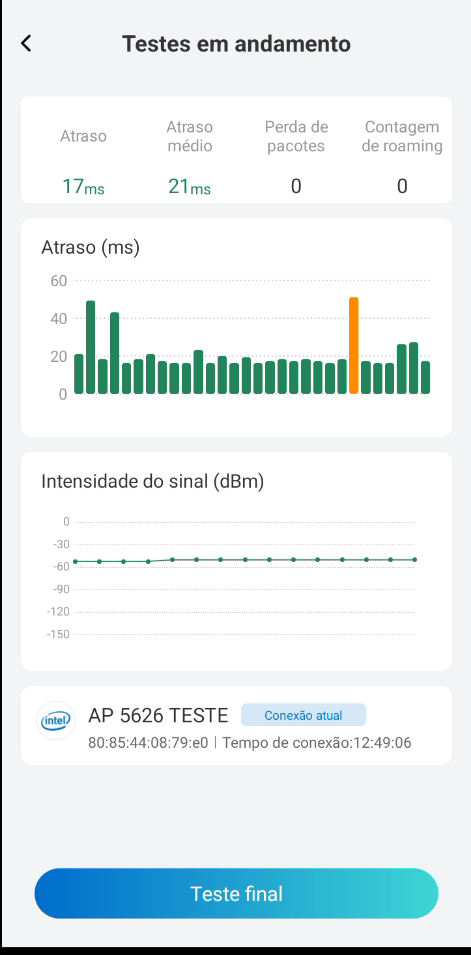
2. Real-Time Monitoring:
Once the test has started, walk around the site. The application will record the network behavior in real time:
- Metrics Panel (top): Displays the current Latency (Atraso), Average latency (Atraso médio), Packet loss (Perda de pacotes) count, and Roaming count (Contagem de roaming - handoffs completed).
- Latency Graph (ms): A bar graph showing latency variation every second. Colored bars (orange) highlight the exact moment when a roaming handoff occurred.
- Signal Strength Graph (dBm): A line graph showing the Wi-Fi signal level received by the smartphone during the test walk.
- Connected AP Information (bottom): Displays the name of the currently connected Access Point (SSID and BSSID), MAC address, and total connection time.
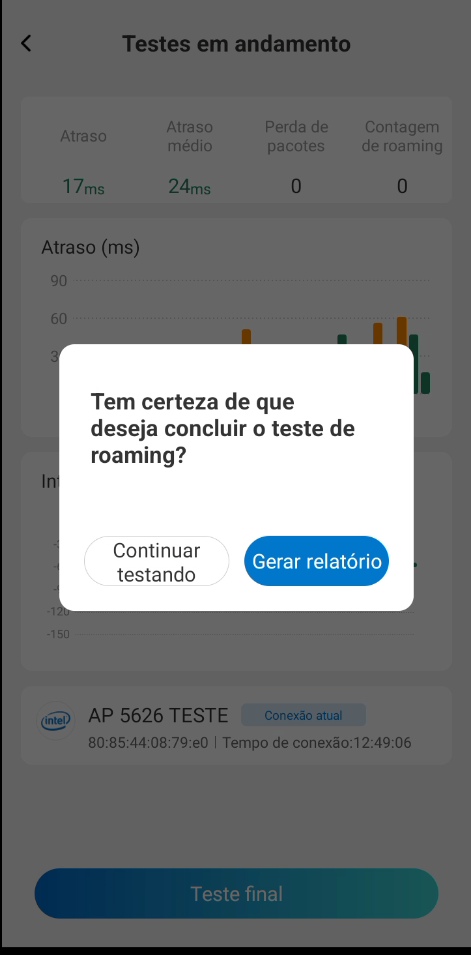
3. Test Completion:
When you finish your walk, tap the End test (Teste final) button at the bottom. A confirmation message will appear: "Are you sure you want to complete the roaming test?" (Tem certeza de que deseja concluir o teste de roaming?):
- Keep testing: Closes the message and continues recording the current test.
- Generate report: Ends measurements and compiles the data into a report.
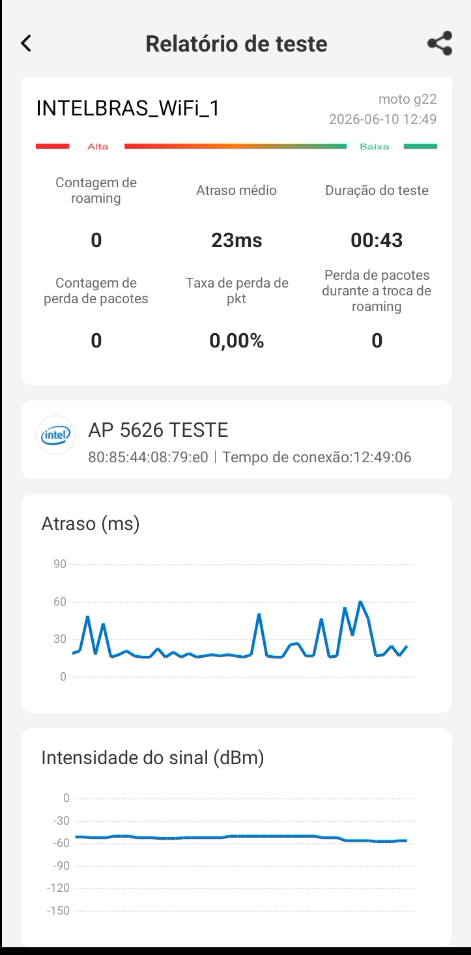
4. Test Report:
The consolidated report provides a detailed analysis of roaming quality during the test walk:
- Summary showing the tested network name, smartphone model, date, time, and total test duration.
- Consolidated metrics for Roaming count, Average latency, Packet loss count, Packet loss rate (%), and Packet loss during roaming handoff.
- Complete latency and signal strength graphs accumulated over the entire test duration.
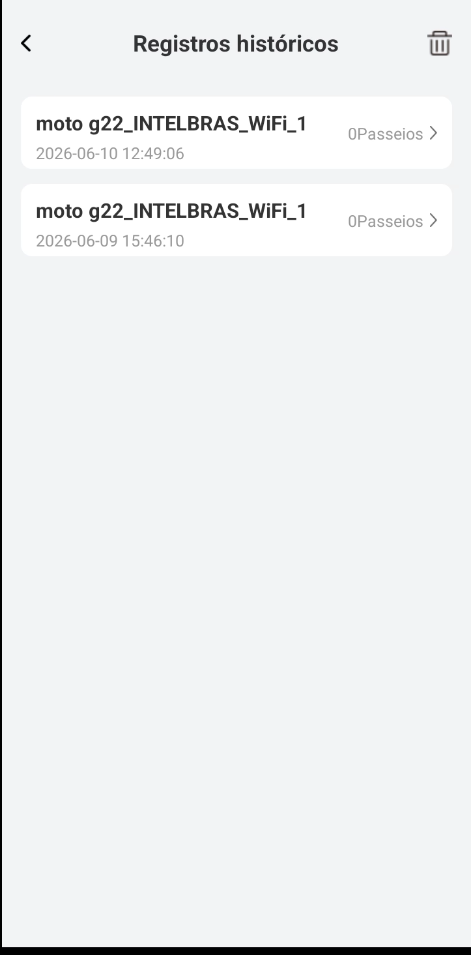
5. Historical Records:
Completed tests are saved in the history section, allowing you to review past reports at any time. Each record shows the device model, tested network name, date/time, and total roaming count (shown as Passeios).
MINE
The Mine (Minhas) tab centralizes the settings of the active account profile in the Intelbras INC Cloud app. At the top of the screen, the currently connected user name or email is displayed (e.g., PROJSPEC495). From this panel, you can access and manage the following options:
- Switch account: Allows you to quickly switch the app's login to another managed account.
- Support: Redirects to the official Intelbras technical support channel.
- Privacy policy: Displays the current version of the legal terms of use and data privacy.
- Language: Allows you to change the display language of the app's interface.
- Current version: Indicates the app build number installed on the smartphone (e.g., 1.0.10.12).
- Delete account: Allows initiating the permanent removal flow of the Intelbras user account.
- Logout (Sair do sistema): Logs out of the active account and returns to the initial login screen.
Customer support: (48) 2106 0006
Forum: forum.intelbras.com.br
Chat support: intelbras.com.br/suporte-tecnico
Email support: suporte@intelbras.com.br
SAC: 0800 7042767
Intelbras S/A – Indústria de Telecomunicação Eletrônica Brasileira
Rodovia SC 281, km 4,5 – Sertão do Maruim – São José/SC - 88122-001
CNPJ 82.901.000/0014-41 - www.intelbras.com.br
Brazilian Industry